环境部署
安装 ADE (Awesome Development Environment)
In this course we will use ADE. This will ensure that all students in the course have a common, consistent development environment.

Docker
The requirement for ADE is to install docker, please follow: https://ade-cli.readthedocs.io/en/latest/install.html#requirements.
To install ADE on your Ubuntu 18.04 computer, execute the following steps or follow the installation instructions from the ADE documentation:
$ cd ${HOME}
$ mkdir adehome
$ cd adehome
$ wget https://gitlab.com/ApexAI/ade-cli/uploads/85a5af81339fe55555ee412f9a3a734b/ade+x86_64
$ mv ade+x86_64 ade
$ chmod +x ade
$ mv ade ~/.local/bin
$ which ade
# Update ade
$ ade update-cli
# Now setup ade
$ touch .adehome
$ git clone --recurse-submodules https://gitlab.com/autowarefoundation/autoware.auto/AutowareAuto.git
$ cd AutowareAuto/src

# 新增依赖
$ git clone -b foxy-devel https://github.com/lgsvl/lgsvl_msgs.git
$ git clone -b foxy-devel https://github.com/ANYbotics/grid_map.git
git clone -b foxy https://github.com/ros-drivers/transport_drivers.git
$ git clone https://gitlab.com/autowarefoundation/autoware.auto/autoware_auto_msgs.git

$ cd ..
$ ade start
# this will take awhile
$ ade enter
Now you should see the following in your prompt:
<your_username>@ade:~$
Note: From now on we will preface command line instructions with $ or ade$ to indicate whether the commands should be run in a plain terminal or inside the ADE environment.
Install ROS 2
Autoware.Auto uses ROS 2 Dashing, which is already installed inside ADE. The installation directory is /opt/ros/dashing/. For instructions on installing ROS 2 from scratch please refer to the ROS documentation for ROS 2 Dashing.
You can confirm the installation by running the following command:
ade$ ros2 -h
You can also try to run the talker/listener example, using two separate terminals.
ade$ ros2 run demo_nodes_cpp talker
ade$ ros2 run demo_nodes_cpp listener
If you want to install additional system packages inside ADE you can use the apt package management tool.
ade$ sudo apt update
ade$ sudo apt install ros-foxy-turtlesim
ade$ sudo apt install ros-foxy-rqt-*
ade$ sudo apt install ros-foxy-desktop

ade$ sudo apt install byobu
Note: Installation of system packages does not persist between ade stop and ade start commands. Anything valuable that needs to persist should be placed in the adehome directory, which is stored on the host and mounted in the ADE environment.
Install Autoware.Auto
Binary version
Autoware.Auto is already installed inside ADE. The installation directory is /opt/AutowareAuto/, which is provided as a docker volume.
From source version
For installation from source you can use the previously cloned version and run the following commands:
ade$ cd AutowareAuto
ade$ colcon build
ade$ colcon test
ade$ colcon test-result
Run object detection demo
Now you are ready to run one of the canonical applications of Autoware.Auto, a LiDAR-based object detection pipeline.
Prerequisites
- Download a pre-recorded pcap file and put it in
${HOME}/adehome/data. - Clone the lecture-specific configuration files:
ade$ git clone https://gitlab.com/ApexAI/autowareclass2020.git ~/autowareclass2020
Execute each of the following commands in a new ADE terminal.
Note: It is necessary to source the Autoware.Auto workspace before each of the following commands. You can do this by executing source /opt/AutowareAuto/setup.bash in the ADE terminal.
<your_username>@ade$ cd
<your_username>@ade$ git clone https://gitlab.com/ApexAI/autowareclass2020.git ~/autowareclass2
# 省略<your_username>@ade
# terminal 1
ade$ cd AutowareAuto
ade$ source install/setup.bash
ade$ udpreplay ~/data/route_small_loop_rw-127.0.0.1.pcap -r -1

#terminal 2
ade$ rviz2 -d /home/${USER}/autowareclass2020/code/src/01_DevelopmentEnvironment/aw_class2020.rviz

# terminal 3(将vlp16_test.param.yaml中的points_xyzi改成了points_in)
ade$ ros2 run velodyne_nodes velodyne_cloud_node_exe --model vlp16 --ros-args --remap __ns:=/lidar_front --params-file /home/${USER}/AutowareAuto/src/drivers/velodyne_nodes/param/vlp16_test.param.yaml

# terminal 4
ade$ ros2 run robot_state_publisher robot_state_publisher /opt/AutowareAuto/share/lexus_rx_450h_description/urdf/lexus_rx_450h.urdf

# terminal 5
ade$ ros2 run point_cloud_filter_transform_nodes  point_cloud_filter_transform_node_exe --ros-args --remap __ns:=/lidar_front --params-file /opt/AutowareAuto/share/point_cloud_filter_transform_nodes/param/vlp16_sim_lexus_filter_transform.param.yaml --remap __node:=filter_transform_vlp16_front --remap points_filtered:=/perception/points_in

# terminal 6(我的autoware.auto包缺少autoware_auto_avp_demo文件夹,所以改成了autoware_auto_launch)
ade$ ros2 run ray_ground_classifier_nodes ray_ground_classifier_cloud_node_exe --model --ros-args --remap __ns:=/perception --params-file /opt/AutowareAuto/share/autoware_auto_launch/param/ray_ground_classifier.param.yaml

# terminal 7
ade$ ros2 run euclidean_cluster_nodes euclidean_cluster_node_exe --ros-args --remap __ns:=/perception --params-file /opt/AutowareAuto/share/autoware_auto_launch/param/euclidean_cluster.param.yaml
为了方便使用,上面命令可以整合成一个launch文件调用:
# terminal 1
gedit ~/AutowareAuto/install/autoware_demos/share/autoware_demos/launch/object_detection_demo.launch.py
添加下面内容:
import os

from ament_index_python import get_package_share_directory
import launch.substitutions
from launch_ros.actions import Node
from launch.actions import Shutdown
from launch.actions import DeclareLaunchArgument, ExecuteProcess, TimerAction
from launch.conditions import IfCondition
from launch.substitutions import LaunchConfiguration, PythonExpression

def get_param_file(package_name, file_name):
    """Pass the given param file as a LaunchConfiguration."""
    file_path = os.path.join(
        get_package_share_directory(package_name),
        'param',
        file_name)
    return launch.substitutions.LaunchConfiguration(
        'params', default=[file_path])

def get_lexus_robot_description(filename):
    # Setup robot state publisher
    vehicle_description_pkg_path = get_package_share_directory(
        'lexus_rx_450h_description')
    urdf_path = os.path.join('/opt/AutowareAuto/share/lexus_rx_450h_description', 'urdf',
                             filename)
    with open(urdf_path, 'r') as infp:
        urdf_file = infp.read()

    return urdf_file

def generate_launch_description():
    velodyne_cloud_node = Node(
        executable='velodyne_cloud_node_exe',
        name='velodyne_cloud',
        on_exit=Shutdown(),
        package='velodyne_nodes',
        parameters=[
            get_param_file('velodyne_nodes', 'vlp16_test.param.yaml'),
            {"model": "vlp16"}
            ],
        remappings=[
            ("__ns", "/lidar_front"),
        ],
    )
    point_cloud_filter_transform_node = Node(
        executable='point_cloud_filter_transform_node_exe',
        name='point_cloud_filter_transform',
        on_exit=Shutdown(),
        package='point_cloud_filter_transform_nodes',
        parameters=[
            get_param_file('point_cloud_filter_transform_nodes', 'vlp16_sim_lexus_filter_transform.param.yaml'),
            {"model": "vlp16"}
            ],
        remappings=[
            ("__ns", "/lidar_front"),
            ("__node", "/filter_transform_vlp16_front"),
            ("points_filtered", "/lidar_front/points_xyzi"),
        ],
    )

    ray_ground_classifier_node = Node(
        executable='ray_ground_classifier_cloud_node_exe',
        name='ray_ground_classifier',
        on_exit=Shutdown(),
        package='ray_ground_classifier_nodes',
        parameters=[
            get_param_file('autoware_auto_launch', 'ray_ground_classifier.param.yaml')
            ],
        remappings=[
            ("__ns", "/perception"),
        ],
    )

    euclidean_cluster_node = Node(
        executable='euclidean_cluster_node_exe',
        name='euclidean_cluster',
        on_exit=Shutdown(),
        package='euclidean_cluster_nodes',
        parameters=[
            get_param_file('autoware_auto_launch', 'euclidean_cluster.param.yaml')
            ],
        remappings=[
            ("__ns", "/perception"),
        ],
    )

    lexus_rx_450h_robot_state_publisher_runner = Node(
        package='robot_state_publisher',
        executable='robot_state_publisher',
        name='robot_state_publisher',
        parameters=[
            {
                'robot_description': get_lexus_robot_description('lexus_rx_450h.urdf')
            }
        ],
    )

    play_pcap = ExecuteProcess(
        cmd=[[
            'udpreplay -r -1 ',
            ' ~/data/route_small_loop_rw-127.0.0.1.pcap '
        ]],
        shell=True
    )

    return launch.LaunchDescription([
        velodyne_cloud_node,
        # point_cloud_filter_transform_node,
        ray_ground_classifier_node,
        euclidean_cluster_node,
        lexus_rx_450h_robot_state_publisher_runner,
        TimerAction(
            period=2.0,
            actions=[play_pcap],
        )
    ])
保存并启动:
# terminal 1
ade$ cd ~/AutowareAuto && source install/setup.bash && source /opt/AutowareAuto/setup.bash
ade$ ros2 launch autoware_demos object_detection_demo.launch.py

# terminal 2
ade$ source /opt/AutowareAuto/setup.bash
ade$ rviz2 -d /home/${USER}/autowareclass2020/code/src/01_DevelopmentEnvironment/aw_class2020.rviz
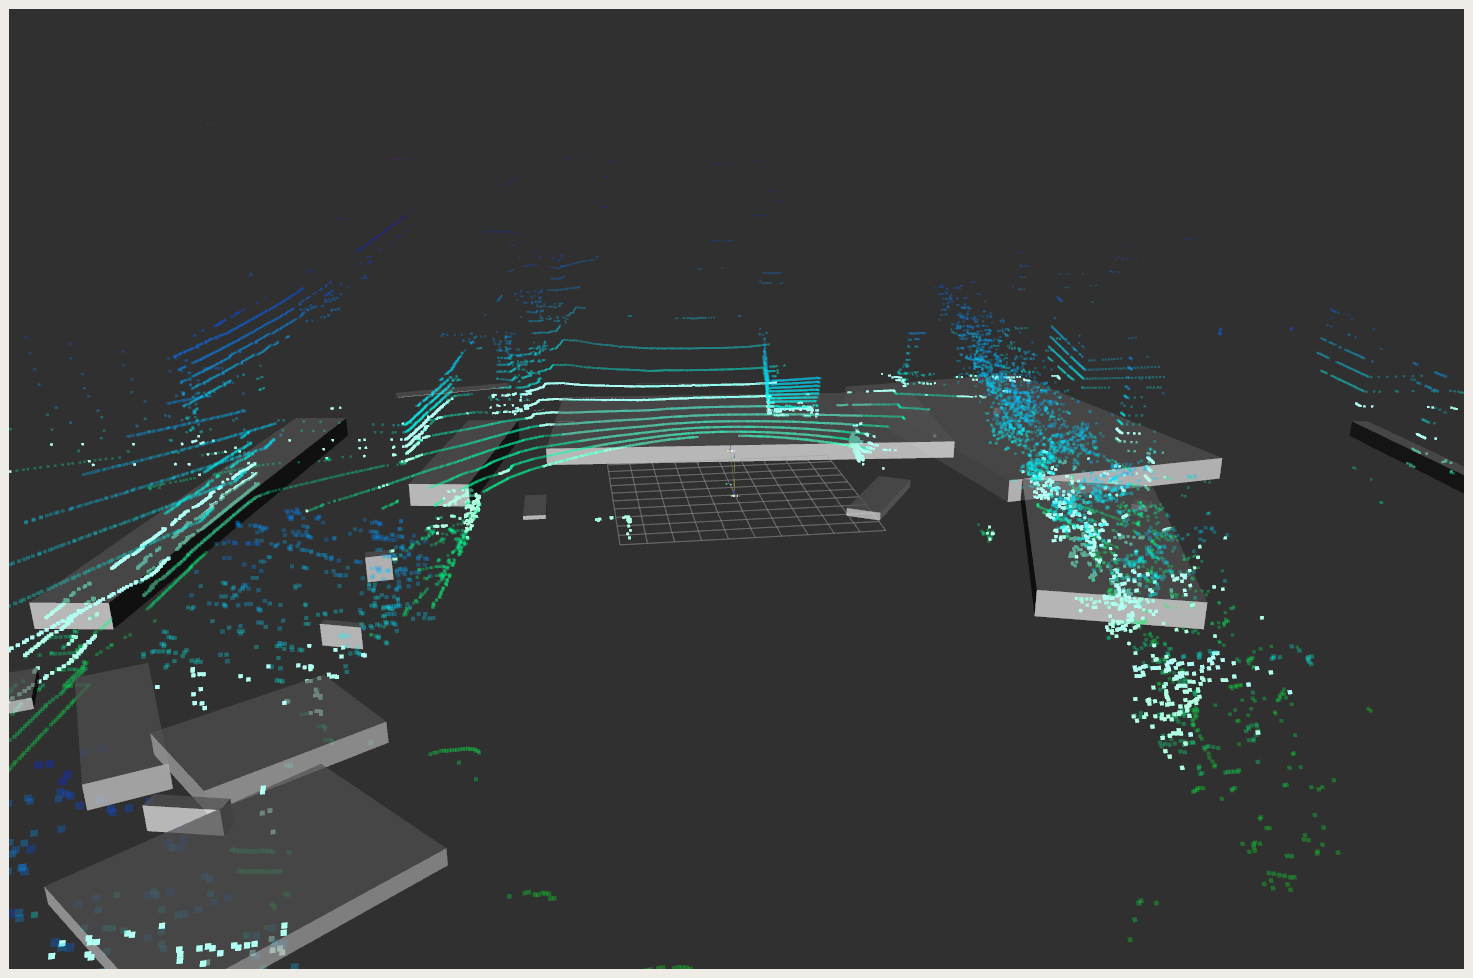
The result should look like this:

Demo:
Edit and compile your code
Now we shall look at how you can create a new Autoware.Auto package, edit it, and compile it.
- Create a new package
ade$ cd ~/AutowareAuto/src ade$ autoware_auto_create_pkg --destination . --pkg-name autoware_my_first_pkg --maintainer "Dejan Pangercic" --email dejan@apex.ai --description "My first Autoware pkg." - Edit a file
ade$ emacs -nw autoware_my_first_pkg/src/autoware_my_first_pkg_node.cpp # Edit one Line - Recompile and execute
ade$ cd ..
ade$ colcon build --packages-select autoware_auto_autoware_my_first_pkg
ade$ source install/setup.bash
ade$ ros2 run autoware_auto_autoware_my_first_pkg autoware_my_first_pkg_exe
Congratulations! Now you have a white belt in Autoware.Auto.
参考资料
1. autowareclass2020_lectures_01_DevelopmentEnvironment


评论区